Intro to GUI Libraries in Python
Graphics Libraries
Python has many different GUI frameworks that are built for either cross-platform compatibility or platform-specific. The Tkinter framework is traditionally bundled with Python which uses the Tk. A full list of available frameworks can be seen here: GUI Programming in Python. We will be using the Tkinter framework. A full tutorial on how to use the different widgets can be found here: An Introduction to Tkinter
Tkinter is the standard Python interface (Tk interface) for the Tk GUI toolkit. The Tk interface module consists of a number of other modules as well. We will cover some but not all of them. In a command line based interface the command line determines the order of execution. The user is directed from one prompt to the next and the order is strictly enforced. With a GUI based interface the user influences the order of events more strongly, therefore GUI interfaces are event driven.
import Tkinter
Tkinter widgets
| Widget | Description |
|---|---|
| Button | A button that can cause an action to occur when it is clicked |
| Canvas | A rectangular area that can be used to display graphics |
| Checkbutton | A button that may be either in the "on" or "off" position |
| Entry | An area in which the user may type a single line of input from the keyboard |
| Frame | A container that can hold other widgets |
| Label | An area that displays one line of text or an image |
| Listbox | A list from which the user may select an item |
| Menu | A List of menu choices that are displayed when the user clicks a Menubutton widget |
| Message | Displays multiple lines of text |
| Radiobutton | A widget that can be either selected or deselected. Radiobuttons usually appear in groups and allow the user to select on of several options. |
| Scale | A widget that allows the user to select a value by moving a slider along a track |
| Scrollbar | Can be used with some other types of widgets to provide scrolling ability |
| Text | A widget that allows the user to enter multiple lines of text input |
| Toplevel | A container, like a Frame, but displays in its own window |
Components
- A graphics component is an object widget having a graphical representation that can be displayed on screen and that can interact with the user
- Some examples of components:
- button
- check box
- text field
- combo box
Containers
- A container is a GUI widget that can contain other
widgets
- Note that a container is a component itself
- But more specifically, it can be used to hold other widgets in a specific area
- Examples of GUI containers:
- Frame
- Toplevel
Events
- Event: A signal that something has happened in a program. Examples: Button clicks, mouse movements, menu selections
- GUI programs generally driven by events, rather than a specific procedural order
- Events are handled with functions or methods. These are triggered by actions on source objects (components or objects on which the event is generated). The listener listens for the event, and invokes an event handler when event occurs
Creating a GUI
import Tkinter

def main():
      # Create a TK root widget
      main_window = Tkinter.Tk()

      # Enter the Tkinter main loop, this will cause the window
      # to be rendered to the screen.
      main_window.mainloop()

main()
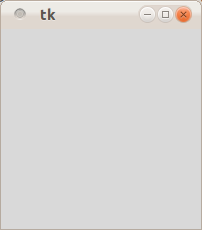
Code: hello_world.py
Display text with Label widget
Tutorial# An object oriented approach to creating GUI's
import Tkinter
class GUI:
def __init__(self):
# Create a TK root widget
self.main_window = Tkinter.Tk()
# Create a Label widget containing the
# text 'Hello World!'
# More options:
# http://www.pythonware.com/library/tkinter/introduction/x5258-options.htm
#
# Notice that we pass the main_window
self.label = Tkinter.Label(self.main_window, text="Hello world")
# Call the Label widget's pack method
self.label.pack()
# Enter the Tkinter main loop, this will cause the window
# to be rendered to the screen.
self.main_window.mainloop()
def main():
window = GUI()
main()
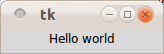
Code: hello_world2.py
All widgets except the root window needs to be packed before it can be rendered: self.label.pack(). The Pack geometry manager packs widgets in rows or columns. You can use options like fill, expand, and side to control this geometry manager. The pack method takes some arguments to determine how to arrange the widgets: options
Widget customization
How to configure.To control the appearance of a widget, you usually use options rather than method calls. Typical options include text and color, size, command callbacks, etc. To deal with options, all core widgets implement the same configuration interface:
widgetclass(master, option=value, ...) => widget
Create an instance of this widget class, as a child to the given master, and using the given options. All options have default values, so in the simplest case, you only have to specify the master. You can even leave that out if you really want; Tkinter then uses the most recently created root window as master. Note that the name option can only be set when the widget is created.
cget(option) => string
Return the current value of an option. Both the option name, and the returned value, are strings. To get the name option, use str(widget) instead.
configure(option=value, ...), config(option=value, ...)
This allows the setting of one or more options (given as keyword arguments). For convenience, the widgets also implement a partial dictionary interface. As a result, you can use the following syntax to set and query options:
value = widget[option]
widget[option] = value
Note that each assignment results in one call to Tk. If you wish to change multiple options, it is usually a better idea to change them with a single call to config or configure.
Organizing Widgets with Frames
We use Frames to hold other widgets. The Frames help organize widgets in a window
# This program creates labels in two different frames.

import Tkinter

class MyGUI:
    def __init__(self):
        # Create the main window widget.
        self.main_window = Tkinter.Tk()

        # Create two frames, one for the top of the
        # window, and one for the bottom.
        self.top_frame = Tkinter.Frame(self.main_window)
        self.bottom_frame = Tkinter.Frame(self.main_window)

        # Create three Label widgets for the
        # top frame.
        self.label1 = Tkinter.Label(self.top_frame, \
                                    text='Winken')
        self.label2 = Tkinter.Label(self.top_frame, \
                                    text='Blinken')
        self.label3 = Tkinter.Label(self.top_frame, \
                                    text='Nod')

        # Pack the labels that are in the top frame.
        # Use the side='top' argument to stack them
        # one on top of the other.
        self.label1.pack(side='top')
        self.label2.pack(side='top')
        self.label3.pack(side='top')

        # Create three Label widgets for the
        # bottom frame.
        self.label4 = Tkinter.Label(self.bottom_frame, \
                                    text='Winken')
        self.label5 = Tkinter.Label(self.bottom_frame, \
                                    text='Blinken')
        self.label6 = Tkinter.Label(self.bottom_frame, \
                                    text='Nod')

        # Pack the labels that are in the bottom frame.
        # Use the side='left' argument to arrange them
        # horizontally from the left of the frame.
        self.label4.pack(side='left')
        self.label5.pack(side='left')
        self.label6.pack(side='left')

        # Yes, we have to pack the frames too!
        self.top_frame.pack()
        self.bottom_frame.pack()

        # Enter the tkinter main loop.
        Tkinter.mainloop()

def main():
   # Create an instance of the MyGUI class.
   my_gui = MyGUI()

main()
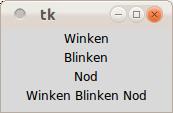
Code: frame_demo.py
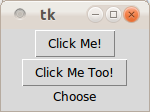
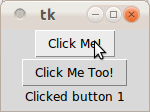
Button Widgets
The use of the Button widget is allow the user to interact with the GUI and generate some event that the programmer can use to cause some action to be performed. Plain buttons are pretty straightforward to use. Simply specify the button contents (text, bitmap, or image) and a callback to call when the button is pressed:
b = Button(master, text="OK", command=self.ok)
# This program demonstrates a Button widget.
# When the user clicks the Button, an
# info dialog box is displayed.
import Tkinter
class MyGUI:
def __init__(self):
# Create the main window widget.
self.main_window = Tkinter.Tk()
# Create a Button widget. The text 'Click Me!'
# should appear on the face of the Button. The
# do_something method should be executed when
# the user clicks the Button.
self.my_button1 = Tkinter.Button(self.main_window, \
text='Click Me!', \
command=self.do_something)
self.my_button2 = Tkinter.Button(self.main_window, \
text='Click Me Too!', \
command=self.do_something_too)
# Pack the Button.
self.my_button1.pack()
self.my_button2.pack()
self.label = Tkinter.Label(self.main_window,text="Choose")
self.label.pack()
# Enter the Tkinter main loop.
Tkinter.mainloop()
# The do_something method is a callback function
# for the Button widget.
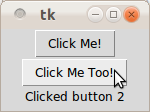
def do_something(self):
self.label.configure(text="Clicked button 1")
def do_something_too(self):
self.label.configure(text="Clicked button 2")
def main():
# Create an instance of the MyGUI class.
my_gui = MyGUI()
main()
Button options
Code: button_demo.py
Getting input with the Entry widget
An Entry widget is a rectangular area that the user can type input into. You use the Entry widget's get method to retrieve the data that has been typed into the widget.
import Tkinter

class GUI:
   def __init__(self):
      self.main_window = Tkinter.Tk()
      self.frame1 = Tkinter.Frame(self.main_window)
      self.frame2 = Tkinter.Frame(self.main_window)
      self.frame1.pack()
      self.frame2.pack()

      self.label_info = Tkinter.Label(self.frame1,text="Enter text:")
      self.label_result = Tkinter.Label(self.frame2,text="None")
      self.label_info.pack(side="left")
      self.label_result.pack(side="left")

      self.button_submit = Tkinter.Button(self.main_window,text="Enter", command=self.submit)

      self.button_submit.pack(side="left")

      self.button_clear = Tkinter.Button(self.main_window,text="Clear", command=self.clear)

      self.button_clear.pack(side="left")

      # Create the Entry object
      self.input_text = Tkinter.Entry(self.frame1, width=20)
      self.input_text.pack(side="left")

      self.main_window.mainloop()

   def submit(self):
      # The text can be retrieved from the field with the get method
      self.label_result["text"]=self.input_text.get()

   def clear(self):
      self.input_text.delete(0, len(self.input_text.get()))
      self.label_result["text"] = "None"

def main():
   demo = GUI()

main()
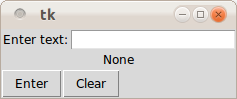
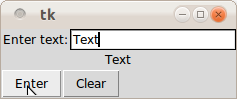
![]()
Code: entry_demo.py
Radio buttons and Check Buttons
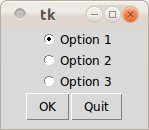
# This program demonstrates a group of Radiobutton widgets.
import Tkinter
import tkMessageBox
class MyGUI:
def __init__(self):
# Create the main window.
self.main_window = Tkinter.Tk()
# Create two frames. One for the Radiobuttons
# and another for the regular Button widgets.
self.top_frame = Tkinter.Frame(self.main_window)
self.bottom_frame = Tkinter.Frame(self.main_window)
# Create an IntVar object to use with
# the Radiobuttons.
self.radio_var = Tkinter.IntVar()
# Set the intVar object to 1.
self.radio_var.set(1)
# Create the Radiobutton widgets in the top_frame.
self.rb1 = Tkinter.Radiobutton(self.top_frame, \
text='Option 1', variable=self.radio_var, \
value=1)
self.rb2 = Tkinter.Radiobutton(self.top_frame, \
text='Option 2', variable=self.radio_var, \
value=2)
self.rb3 = Tkinter.Radiobutton(self.top_frame, \
text='Option 3', variable=self.radio_var, \
value=3)
# Pack the Radiobuttons.
self.rb1.pack()
self.rb2.pack()
self.rb3.pack()
# Create an OK button and a Quit button.
self.ok_button = Tkinter.Button(self.bottom_frame, \
text='OK', command=self.show_choice)
self.quit_button = Tkinter.Button(self.bottom_frame, \
text='Quit', command=self.main_window.destroy)
# Pack the Buttons.
self.ok_button.pack(side='left')
self.quit_button.pack(side='left')
# Pack the frames.
self.top_frame.pack()
self.bottom_frame.pack()
# Start the mainloop.
Tkinter.mainloop()
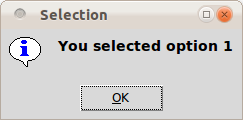
# The show_choice method is the callback function for the
# OK button.
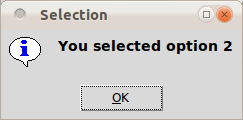
def show_choice(self):
tkMessageBox.showinfo('Selection', 'You selected option ' +\
str(self.radio_var.get()))
def main():
# Create an instance of the MyGUI class.
my_gui = MyGUI()
main()

Radiobutton methods
Radiobutton options
Code: radiobutton_demo.py
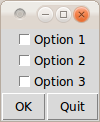
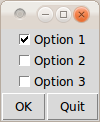
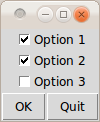
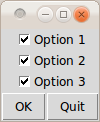
# This program demonstrates a group of Checkbutton widgets.
import Tkinter
import tkMessageBox
class MyGUI:
def __init__(self):
# Create the main window.
self.main_window = Tkinter.Tk()
# Create two frames. One for the checkbuttons
# and another for the regular Button widgets.
self.top_frame = Tkinter.Frame(self.main_window)
self.bottom_frame = Tkinter.Frame(self.main_window)
# Create three IntVar objects to use with
# the Checkbuttons.
self.cb_var1 = Tkinter.IntVar()
self.cb_var2 = Tkinter.IntVar()
self.cb_var3 = Tkinter.IntVar()
# Set the intVar objects to 0.
self.cb_var1.set(0)
self.cb_var2.set(0)
self.cb_var3.set(0)
# Create the Checkbutton widgets in the top_frame.
self.cb1 = Tkinter.Checkbutton(self.top_frame, \
text='Option 1', variable=self.cb_var1)
self.cb2 = Tkinter.Checkbutton(self.top_frame, \
text='Option 2', variable=self.cb_var2)
self.cb3 = Tkinter.Checkbutton(self.top_frame, \
text='Option 3', variable=self.cb_var3)
# Pack the Checkbuttons.
self.cb1.pack()
self.cb2.pack()
self.cb3.pack()
# Create an OK button and a Quit button.
self.ok_button = Tkinter.Button(self.bottom_frame, \
text='OK', command=self.show_choice)
self.quit_button = Tkinter.Button(self.bottom_frame, \
text='Quit', command=self.main_window.destroy)
# Pack the Buttons.
self.ok_button.pack(side='left')
self.quit_button.pack(side='left')
# Pack the frames.
self.top_frame.pack()
self.bottom_frame.pack()
# Start the mainloop.
Tkinter.mainloop()
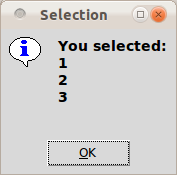
# The show_choice method is the callback function for the
# OK button.
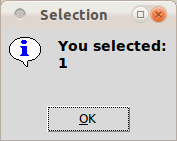
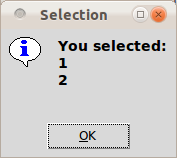
def show_choice(self):
# Create a message string.
self.message = 'You selected:\n'
# Determine which Checkbuttons are selected and
# build the message string accordingly.
if self.cb_var1.get() == 1:
self.message = self.message + '1\n'
if self.cb_var2.get() == 1:
self.message = self.message + '2\n'
if self.cb_var3.get() == 1:
self.message = self.message + '3\n'
# Display the message in an info dialog box.
tkMessageBox.showinfo('Selection', self.message)
def main():
# Create an instance of the MyGUI class.
my_gui = MyGUI()
main()
Checkbutton methods
Checkbutton options
Code: checkbutton_demo.py